Showing posts with label Makeover. Show all posts

Tuesday, February 12, 2013

Transform Your Furniture with O'verlays

I stumbled upon the fabulous greek key chest (below) and discovered it was a fairly easy DIY makeover  using an incredible product called O'verlays to glam up an IKEA Malm dresser. Have you heard of this company before? I hadn't until yesterday and absolutely love the concept and idea behind these simple overlays. Created by friends Danika and Cheryl, they launched a line of overlay designs in a lightweight composite material that allowed greater flexibility and less splintering, an issue with the original vintage balsa wood panels. They also made sure the product could be paintable to allow for endless looks. Everything is compatible with specific IKEA furniture pieces but you can also use them for any old furniture that needs some sprucing up! Here's a look at a few makeovers that have inspired me to want to redo some of my own furniture! What do you think about O'verlays? Have you used them before? For more amazing DIY projects, visit the O'verlay blog!

{DIY Project by Amanda Carol at Home}


This IKEA Malm dresser was completely transformed by using the Greek Key Fret design from O'verlays, which were spray painted gold. Click here for details on how Amanda transformed this piece! 
[IMAGES FROM AMANDA CAROL AT HOME]

********
{DIY Chinoisere Etegare via Sanity Fair}


I found this awesome DIY transformation over on the blog Sanity Affair, where a $70 IKEA shelving unit was painted white and embellished with these fun Greek Key corners from O'verlays. How amazing, right? Click here for the complete step-by-step project.
[IMAGES FROM SANITY FAIR]
 
*******

Gold painted overlays dress up this simple white chest. Details found on the O'verlay blog.

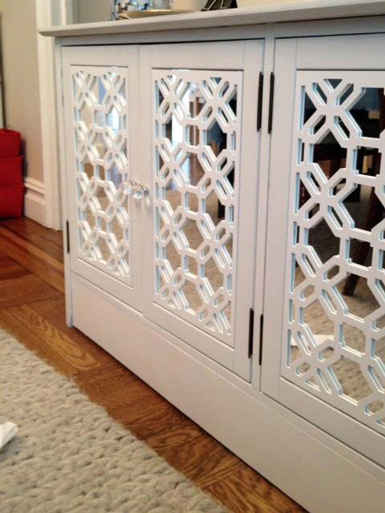
Custom mirrored GiGi panels via the O'verlay blog

This door was transformed with chalkboard paint and O'verlay's Anne 19" Squares! Details on their blog.

********

Friday, October 21, 2011

Recent Project: Closet Set Design (AFTER PHOTOS!)

Happy Friday! How was your week? Mine was busy and productive (which I thrive on!). Yesterday I added the finishing touches to the closet set I designed for my client Kiyonna (which I blogged about here last month). Kiyonna is a fabulous woman's clothing company and the owner wanted to create a stylish closet "set" design that would act as a backdrop to create videos on their latest collections, clients, etc. The goal was to create an expensive looking closet on a budget, which was absolutely doable. Because the closet was going to act as a backdrop to showcase mostly clothing with some color and pattern, I wanted to keep the color palette fresh and neutral. The design scheme was centered around sophistication and glamour, featuring a sparkly chandelier, tons of fun shoes, handbags and a few decorative accessories. Directly below is a snapshot of what the space looked like before, and the rest are details on the "after"! Now if only I could take the time to design my own closet to look this way...someday, right?! 
Enjoy and have a great weekend. I'll be celebrating my 31st Birthday on Sunday with family and friends. I'm looking forward to it :) xoxo - Julie

BEFORE 
(a large room at Kiyonna's corporate office being used for extra storage)

After brainstorming my client, this was the revised design concept we settled on...

AFTER
(the room was cleaned out and re-designed to look like a luxury walk-in closet)

Just above the vanity area we painted alternating stripes in neutral colors, which was an inexpensive alternative to wallpaper. The framed letter "K" represents the company brand. 

 The chandelier we ordered from Overstock.com was fabulous and super affordable!

I scored this cream leather chair trimmed with silver nailheads from HomeGoods!


The closet was designed using IKEA's Pax System, which has components you can mix and match to create a custom closet to fit your space and needs.


I kept the accessories minimal and clean. The last think I wanted to do was over-accessorize and leave the closet looking cluttered.

PHOTOGRAPHED BY JULIE THIGPEN

******

Thursday, September 22, 2011

Good Shepherd Charity Project: AFTER Photos of Room Makeover

Several of you have been asking me, "When are you going to post the AFTER pictures from the Good Shepherd project?!" Well, the wait is finally OVER and I'm so excited to be sharing with you the final results of the room I had the pleasure of re-designing back in June. Just to quickly re-cap on the project:  Earlier this year, project manager and organizers, Vanessa De Vargas and Vanessa Kogevinas, recruited 30 designers in the LA area to design and furnish 30 rooms at the Good Shepherd Center in Los Angeles, a center for homeless woman and children. The units we worked on serve as temporary housing to help single women of all ages get back on their feet, after facing financial hardship, addiction, abuse, or any other unfortunate circumstance that contributed to them becoming homeless. The project was 100% pro-bono and we all volunteered our time and resources to make it happen. We had 30 days to completely transform our individual room, however we saw fit. This was hands-down, the most rewarding design project I have ever been a part of. It was a pleasure to work at a women's center staffed with the sweetest group of women and nuns. I also enjoyed meeting and becoming friends with several of the other designers who participated in this project. So, without further adieu, here are the BEFORE & AFTER photos of the room I designed...Enjoy!

********************

{BED BEFORE}

 {BED AFTER}
I replaced the existing bed (which was more like a brick mattress on a piece of plywood) with a brand new frame, mattress, and box spring. One of my upholstery vendors donated the custom headboard, which I had upholstered in a bright white mircrosuede fabric (daring choice to go white white, but I think it was worth it!)

I purchased this Bungalow 5 chest (which was one of several donated at a very discounted price) and had it re-painted in a high gloss white (was originally off-white). I changed out the hardware to petite crystal knobs, which I purchased from Target. The acrylic lamp is also from Target.

I replaced the existing ceiling light fixture (which was awful) with this beautiful round glass beaded chandelier. We added the ceiling medallion to dress things up, which made a huge difference! (only $20 from Lowes).


I thought this art print added the perfect touch of inspiration to the space. "Life is Beauty Full" by Sugarboo Designs, donated from my online shop.
 
********************

{ROOM BEFORE}

 {ROOM AFTER}

When I first started designing this project, I selected the drapery fabric first, and built the rest of the room around it. The fabric I chose was Woven Jacquard Ikat Fret Raspberry by Robert Allen. I LOVE the way the drapery panels turned out! They totally "made" the entire space.


I started off with a pink, white and gray color scheme, then decided it needed a pop of yellow. I found this amazing chair from HomeGoods at the very last minute (literally, 2 days before the project deadline)! It was like it was made just for this room!

I hung a pair of white lacquered shelves from IKEA above the chair, to give the woman living in the room a place to store books, display picture frames, etc. Shelves are a great way to add storage to a small space (especially if there isn't enough room for a bookcase).

********************

{BEFORE}

{AFTER}

I wanted to create a small work space that felt separate from the rest of the room, so I placed the desk (which was a total steal from Target.com) underneath a window that faced out to a nice view. I changed out the hardware with vintage style crystal knobs - they completely transformed the look. The (2) white cutout art prints were from HomeGoods.


The desk chair was donated by Bassman-Blaine and Associates one of my favorite sales agency/showrooms ever! (To-the-trade only).

********************

{VANITY AREA BEFORE}

{VANITY AREA AFTER}

To brighten up the vanity area, I painted the back wall a bold shade of pink called Couture by Valspar (available at Lowes). The existing light fixture was switched out for a sweet little crystal chandelier (also from Lowes). In lieu of a towel ring, I used adorable gold crown hooks, which can also be used to hang jewelry. The gorgeous mirror was donated by one of my FAVORITE vendors, Made Goods (the Sabine mirror, made of faux Shagreen).

********************

{MORE AFTER PHOTOS}
I wanted to create a small entryway upon walking into the room, so I added this magenta chest, which had a distressed finish that gave it a vintage look. I hung a bulletin board above the chest so the woman living in this room can easily keep track of her appointments, reminders, etc. 


Me with my amazing husband Ryan, who I could NOT have done this project without. He was my handyman, painter, furniture assembler, and back-up designer when I needed another eye (he's the one who pushed me to do the bright white headboard). I love him more than words and am blessed to call him my husband and best friend :)

Posing with new friends (and the only other designers working on this project from "the OC", everyone else was from LA). On my left, Typhanie Peterson from Shoebox Decor & on my right, Jessica from Jessica Bennett Interiors.

That's a wrap! This was taken at the end of day 2 of the Open House weekend, just before I packed up and left room #110 for good. It's now being occupied by one blessed woman, who is fortunate to be a part of the Good Shepherd family. I wish her, and all of the women who stay in this room throughout the years, the very best in life and much success and happiness. xoxo - Julie 

 ********************
A very special thanks to the following companies who contributed to my room design and made it possible for me to complete this project:


Also, a very special thanks to my family, friends and clients for their generous donations with time and/or money. I am forever grateful. 

Friday, July 8, 2011

Feeling Crafty? Weekend DIY Project Ideas

I've been in the mood lately to do some hands-on design updates around my apartment. Unfortunately, it seems like my husband and I have something going on every single weekend, leaving me little time to actually get caught up around the house and make some much needed changes to our decor! Do you ever feel this way? Well, if you're lucky enough to find some free time over the weekend and are feeling crafty, check out these fun DIY project ideas for inspiration. *** Have a great weekend! Be sure to visit next week for a sneak peek at my completed room makeover for the Good Shepherd charity design project + details on the open house event, taking place July 23rd and 24th in LA! xoxo - Julie